
[Pure Drive] Inquiries about PD-7100F / PD-7100S
The PD-7100F and PD-7100S are spot coolers that use evaporative cooling.
They do not emit hot air, so the surrounding area does not get warmer.
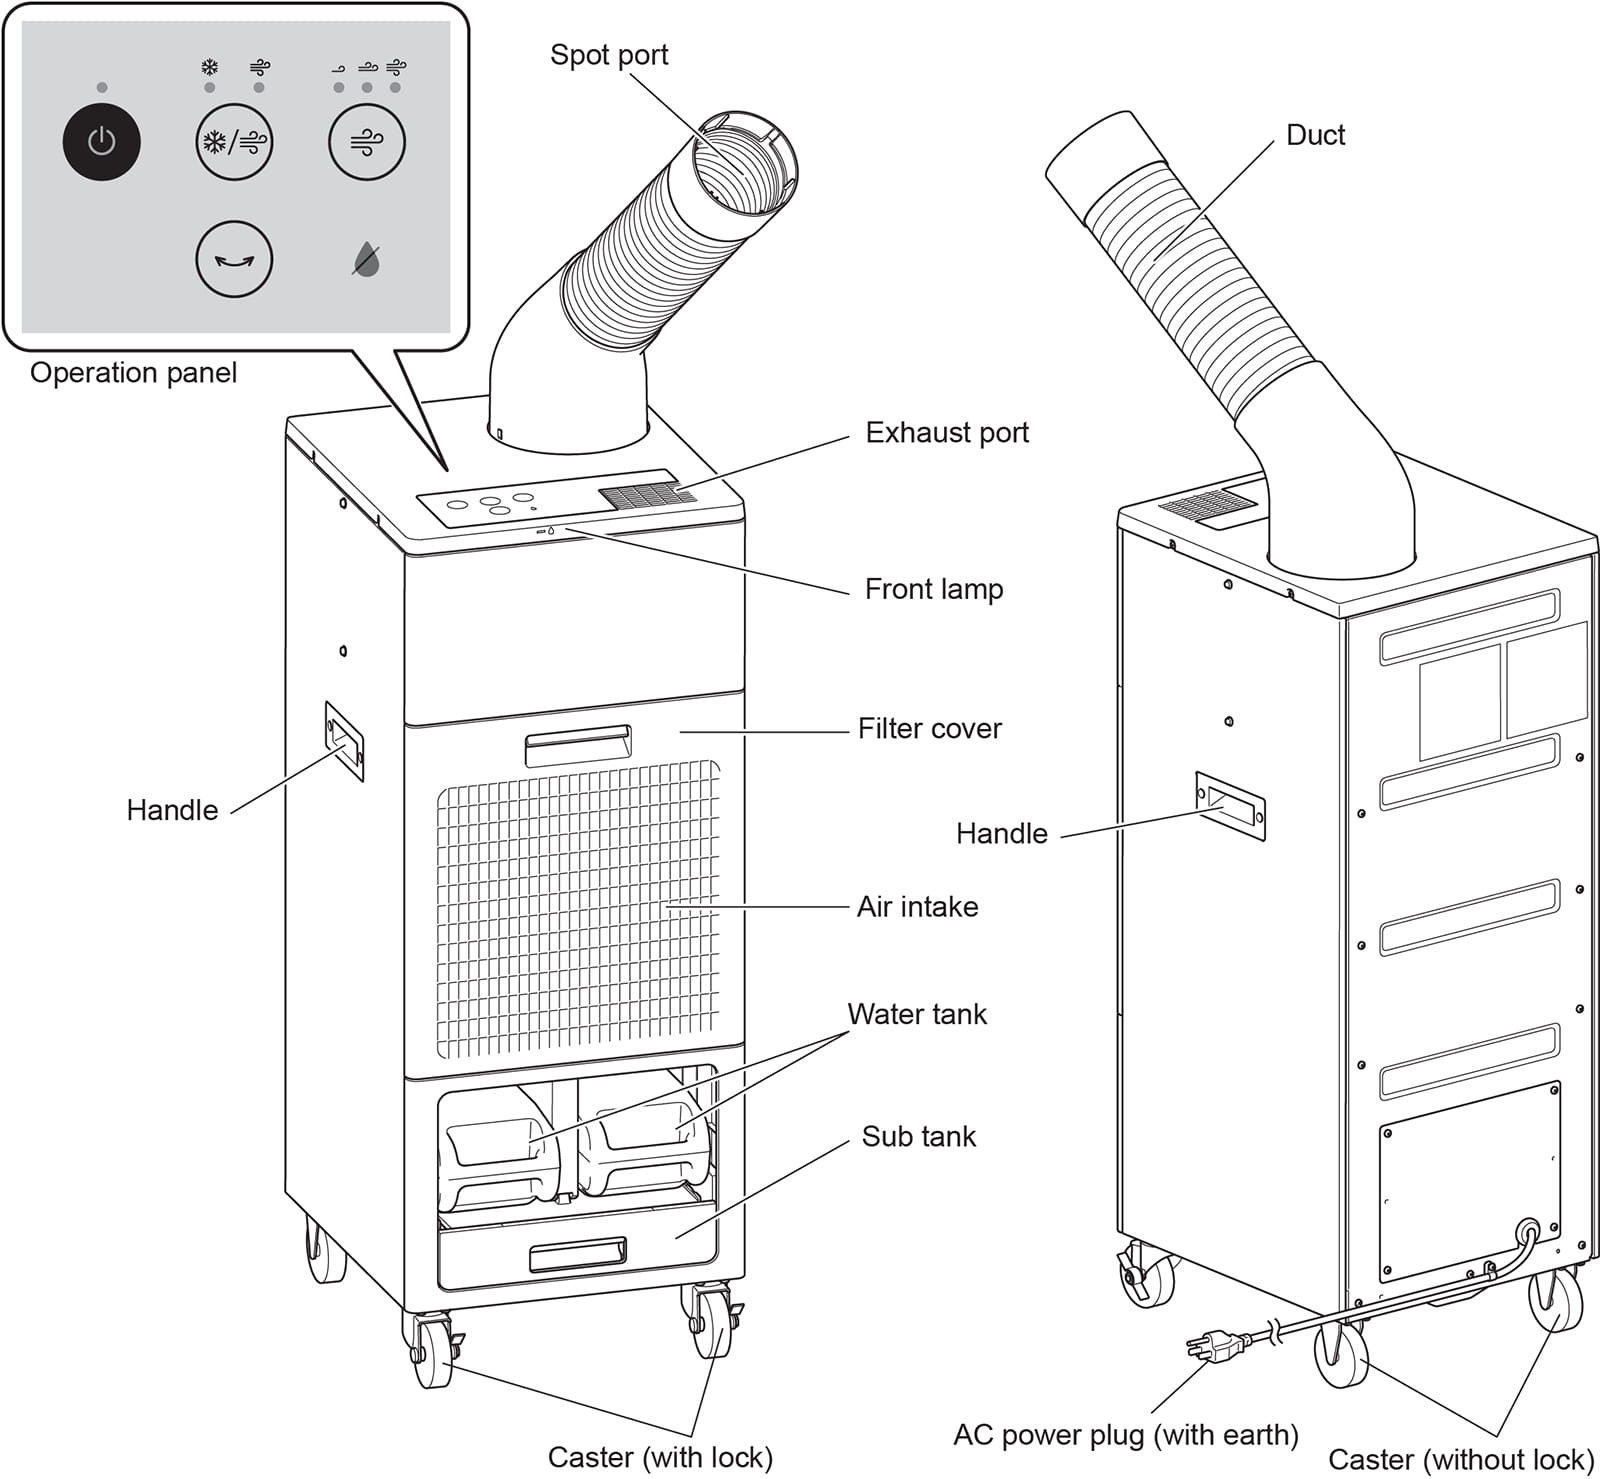
Control Panel Components
- Filter Cover
- Air intake
- Water Supply Tank
- Sub Tank
- Casters (with lock)
This page provides information on product specifications, how to fill and drain the water supply tank, maintenance procedures, as well as consumables and optional accessories.
-
About Product Specifications
Unless otherwise specified, the listed specifications are common to both models.
Model PD-7100S: Oscillating Head Type Power Supply AC 100V
50/60HzAirflow (3-level adjustable) High: 500 m³/h
Medium: 410 m³/h
Low: 300 m³/hPower Consumption High: 220W
Medium: 125W
Low: 65WWater Supply Method Removable Tank Tank Capacity Approx. 10L (5.0L × 2 tanks) Continuous Cooling Operation Time Approx. 6 hours (Medium airflow, 35°C / 50% humidity)
Approx. 8 hours (Medium airflow, 35°C / 60% humidity)Air Speed High: 18 m/s
Medium: 14 m/s
Low: 10 m/sExternal Dimensions W 390 mm × D 430 mm × H 990 mm (excluding duct) Net Weight PD-7100S: 32 kg (without water) Power Cord Length 2m Plug Type 3-prong plug Oscillation Angle (PD-7100S only) Approx. 80° -
Water Supply Method
- Lift the handle of the water supply tank and pull it forward to remove it.

- When removing the water supply tank from the unit, make sure to lock the two casters (with locks) in the ON position.
- If you try to remove the water supply tank while the casters (with locks) are in the unlocked (OFF) position, the unit may move and cause injury.
- Remove the water supply/drain cap from the water supply tank.

- Add a small amount of water to the water supply tank, attach the water supply/drain cap, and shake the tank to rinse it.

- Turn the water supply/drain outlet of the tank downward to discard the water used for rinsing, then fill the tank with tap water.
- Securely close the water supply/drain cap on the water supply tank.
- "Attach the water supply tank to the main unit
"

- Since the tank becomes heavy when filled with water, be sure to carry it with both hands.
- Check for any water leakage from the tank or sub tank.
- If there is any leakage, please contact the retailer where you purchased the product or the call center.
- Lift the handle of the water supply tank and pull it forward to remove it.
-
Drainage Method
Draining the Water Supply Tank
- Lift the handle of the water supply tank and pull it forward to remove it.
- Remove the water supply/drain cap from the water supply tank.
- Turn the water supply/drain outlet of the tank downward to drain the water, then securely close the water supply/drain cap.

- Attach the water supply tank to the main unit.
[Draining the Sub Tank]
- Remove both water supply tanks from the main unit.
- Remove the sub tank from the main unit.

- When removing the sub tank from the main unit, always remove the water supply tanks first before removing the sub tank.
- The sub tank cannot be removed while the water supply tanks are still attached.
- Lift the left tab and open the sub tank cover.

- Fully open the sub tank cover and remove it by lifting it upward.

- Drain the water from the sub tank.

- Attach the sub tank cover to the sub tank.

- Close the sub tank cover and secure the tab.
- Attach the sub tank to the main unit.
※ Be sure to insert it all the way in.

- Attach the water supply tank to the main unit.
- If the unit is not used daily, perform the automatic stop function’s drying operation at the end of use to dry the inside of the unit.
- After the drying operation, always drain any remaining water from the water supply tank and sub tank. Leaving water in the tanks may cause unpleasant odors due to decay or microbial growth.
- When transporting or moving the unit, please drain the water from the water supply tank and sub tank before moving it.
-
Maintenance Instructions
Drain any remaining water from
the water supply tank and sub tankDaily Clean the air filter Once every 2 weeks Clean the cooling unit Once every 2 weeks Clean the sub tank Once every 2 weeks Clean the water supply filter Once every 2 weeks - Make sure the power plug is completely disconnected from the outlet.
- Confirm that the unit is placed on a level surface and that the two casters (with locks) are locked (ON).
If the air filter becomes heavily soiled, it may reduce cooling performance and airflow.
Please clean the air filter approximately once every two weeks.- Pull the lever on the filter cover and remove it from the main unit.

- Pinch the two latches and remove the air filter cover from the filter cover.

- Remove dust from the air filter using a vacuum cleaner or wash it thoroughly with water or lukewarm water.

- After washing, rinse thoroughly with water and let it dry.
- Do not use organic solvents such as thinner or trichlorethylene for cleaning.
- If the air filter is damaged or torn, it may not function properly.
If you find any damage or tears, replace the air filter immediately.
Using a damaged filter may cause malfunction of the unit.
- Insert the two guides of the air filter cover into the filter cover and attach the air filter cover.

- Secure the two latches of the air filter cover to the filter cover.

- Insert the guide of the filter cover into the main unit, then release the lever to attach the filter cover to the main unit.

- Close the filter cover until you hear a click.
- If the filter cover is not fully closed and you press the "Start/Stop" button, all the LED lamps on the control panel will light up, and the unit will not operate.
- Press the "Start/Stop" button again after closing the filter cover completely.
- Do not remove the filter cover while the unit is operating. There is a risk of injury from moving parts.
- Make sure the unit is placed on a level surface and that the two casters (with locks) are locked (ON).
If the cooling unit becomes heavily soiled, it may reduce cooling performance and airflow. Please clean the cooling unit approximately once every two weeks.
- Remove the filter cover from the main unit.
- Lift the lock lever.

- Pull out the cooling unit with one hand until the side handle is visible, then grasp the side handle with both hands and remove the cooling unit.

- Dissolve baking soda or citric acid well in lukewarm water (below 40°C), and soak the cooling unit in it for about 30 minutes to clean.

※ Use baking soda for oil stains and odors, and citric acid for water scale and mold.
※ Recommended amount of baking soda: 40 g per 1 L of water
※ Recommended amount of citric acid: 6 g per 1 L of water- Do not mix baking soda and citric acid together.
- Residue from baking soda or citric acid may cause odors or malfunction.
- If the cooling unit is used continuously without proper cleaning with baking soda or citric acid, its lifespan may shorten, and replacement may be required in less than three years.
- Baking soda and citric acid can be purchased at pharmacies or home improvement stores; please store them properly.
- If water scale is difficult to remove, extend the soaking time (up to a maximum of 2 hours).
- Rinse the cooling unit with tap water.
※ If you have removed the cooling element, rinse the cooling element with tap water as well. - Attach the cooling unit to the main unit.
※ If you have removed the cooling element, attach it to the cooling unit before installation.Additional Notes
If white water scale (mineral deposits) is attached to the cooling element (see next page), it is recommended to clean it using citric acid.
If you can visually confirm that the white water scale is only on the cooling element, you can remove the cooling element from the cooling unit for cleaning.
- Press the two tabs and remove the cooling element case cover.

- Remove the cooling element from the cooling unit.

- Dissolve citric acid well in lukewarm water (below 40°C), and soak the cooling element for about 30 minutes to clean.
- Attach the cooling element to the cooling unit.

- Engage the two tabs and attach the cooling element case cover to the cooling unit.

- Press the two tabs and remove the cooling element case cover.
- Lower the lock lever.

- Attach the filter cover to the main unit.
- Remove the water supply tank and sub tank from the main unit, then remove the sub tank cover.
- Lift the handle of the water supply filter upward and remove the water supply filter.

- Wash the sub tank and sub tank cover with tap water.
- Attach the water supply filter.
Push the water supply filter down until it clicks into place.

- Attach the sub tank with the sub tank cover and the water supply tank to the main unit.
If the water supply filter becomes heavily soiled, it may cause a decrease in cooling performance and airflow. Please clean the water supply filter approximately once every two weeks.
- Remove the water supply tank and sub tank from the main unit, then remove the sub tank cover.
- Lift the handle of the water supply filter upward and remove the water supply filter.
- Clean the water supply filter with tap water. (If the filter is heavily soiled, please replace it with a new one.)
- Attach the water supply filter. Push it down until it clicks into place.
- Attach the sub tank with the sub tank cover and the water supply tank to the main unit.
-
Consumables and Optional Accessories
Please replace the following consumables approximately every three years.
Cooling Unit Air Filter Water Supply Filter 


Frequently Asked Questions (FAQ)
Frequently Asked Questions (FAQ)
-
Can groundwater or well water be used?Please use tap water in the water supply tank.
(Since groundwater or well water does not contain chlorine like tap water, it can promote bacterial growth.) -
Can the airflow direction be changed?The duct at the air outlet is flexible, allowing you to adjust the airflow direction including up and down.
If Repair is Needed
-
Checklist for Sending in Repairs (Request)
- Please completely drain and wipe dry any remaining water in the sub tank.
- After lifting the handles of the left and right water supply tanks and pulling them forward, remove the sub tank as well.
- While pressing the blue ○ nozzle with your finger, tilt the main unit slightly forward to drain any remaining water from the pump.
- Please prepare a cloth or rag that can get wet.

- Dry the unit in fan mode for about 1.5 hours.
- If the main unit powers on, please run this operation.
- If the inside of the unit is not properly dried, bacterial growth may cause unpleasant odors.

- Please remove all accessories.
- Refer to the user’s guide for instructions on how to remove each accessory.
- Our company will use parts we have in stock to perform the post-repair startup check.
- We cannot provide warranty coverage for any accessory damage or loss if the accessories are not removed before shipment.
- Accessories will not be replaced as part of the repair.

- Please pack and ship the product in an upright position.

- Please completely drain and wipe dry any remaining water in the sub tank.